Texture Modification using Render Targets, with some Stencil Buffer Action
Sometimes you need to modify a texture while your game is running, and there are a number of ways to do this. One of the first things newer game programmers often try to do is use Texture2D.GetData to copy the texture data from the GPU to an array on the CPU, modify the bytes, and then send it back to the GPU with Texture2D.SetData.
This is a bad idea on many levels. Beyond issues with pipeline stalls, GetData and SetData can be slow, especially when working with a large texture. Any time you’re tempted grab data from the GPU for use on the CPU you should very carefully consider all of your options. There are often other solutions that let you keep the data entirely on the GPU and accomplish the same thing.
This tutorial will use an example that could be solved with GetData and SetData, and show you another alternative using render targets and the stencil buffer that will let you perform the same function entirely on the GPU.
CPU Craters
Let’s pretend you want to draw 2D planet, and periodically add a crater to it. You want a hole to appear somewhere on the planet, so it looks like part of it was removed.
You could do this using the GetData/SetData method by getting the data from a texture into an array, setting the color to the background (or alpha to 0) in the shape of the crater, then writing the data back to the texture. Or you could be a little cleverer and eliminate GetData by always keeping the data in the array, but you still have to do the SetData to get it into the texture on the GPU each time it’s changed.
GPU Craters
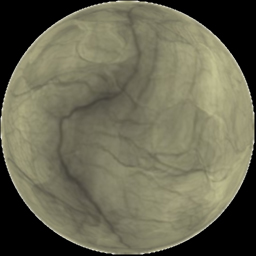
The method we’ll use to do this entirely on the GPU involves several steps. First, we need a couple of resources. We’ll use a simple textured circle for a planet, and a crater shaped texture for the crater.
It’s important to note that the black areas on these have an alpha value of 0, meaning completely transparent. For the planet this just lets us draw the round shape over the background without looking like a square image. But for the crater image the alpha value is very important since it will control what part of the crater image is removed from the planet.
Next, we need to set up two render targets (these will be referred to later as Render Target A, and Render Target B). When we need to add a crater, one of these will be used as a target for drawing to, while the other used as a texture. The next time we add a crater they will swap roles – the texture will become the target, and the target will become the texture. This is called “ping-ponging” and will be discussed more fully later.
Once we have these resources ready to go, the method for adding a crater goes like this:
- Activate Render Target A using GraphicsDevice.SetRenderTarget.
- Clear the graphics device, setting the color to solid black, and the stencil buffer to 0.
- Set up the stencil buffer state so whatever we draw writes a value of 1 to the stencil buffer.
- Set up the alpha test state so we only draw where the alpha value is zero.
- Draw the crater texture. Because of the way we’ve set up the graphics device, only the parts of the crater texture that have alpha = 0 will be drawn, and those parts will write a 1 to the stencil buffer. So what we have at this point is a “mask” in the stencil buffer that we can use in the next step. The white area in the following image represents the stencil mask we’ve set up – the stencil buffer contains “1” in the white area, and “0” everywhere else.
- Set up the stencil buffer so when we draw, anything that has a value of 1 in the stencil buffer will be masked out – meaning it won’t draw.
- Draw the “planet texture”. Because of the way we’ve set up the graphics device, anything with a 1 in the stencil buffer won’t be drawn – since these 1’s are in the shape of a crater, that shape will be masked out of the planet texture, leaving holes that look like craters.
- Set the render target to the backbuffer. We can now access Render Target A as a texture, and that texture contains the planet texture with a crater-shaped hole in it.

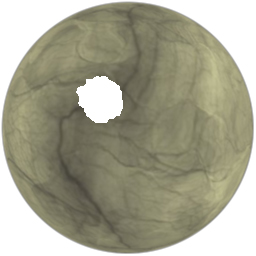
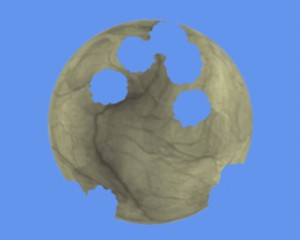
From now on, until we need to add another crater, we can treat Render Target A as a texture and draw it using SpriteBatch, and we’ll have a nice crater. Now, what if we need to add another crater? This is where the ping-ponging comes in. Since Render Target A is now the “planet texture”, we need to be able to draw somewhere else when we’re filling in the stencil buffer with our crater shape. It just so happens that we set up another place to draw to, Render Target B.
So now, in Step 1, instead of activating Render Target A we need to activate Render Target B and draw the crater shapes into that. But what happens when we get to Step 7? Well, the “planet texture” is now in Render Target A, so we draw that. And in Step 8, Render Target B now contains our new planet texture with two craters.
And if we add a third crater then we’re back to where we started – drawing to Render Target A, and using Render Target B as the source texture. In other words, we “ping-pong” between the two render targets – each time we need to modify the texture, one is used for a texture, and one is used for drawing to, and then those roles are swapped.
You may have noticed that there’s one issue here. The first time through, Render Target B has nothing in it, so we can’t use it as the planet texture. This can be handled by using the actual planet texture the first time, and the render target thereafter.
The Code
Now let’s walk through the code involved, using XNA 4.0. You can do this in 3.1, but you’ll have to make significant changes when creating the render targets and setting the render states.
The complete code is in the downloadable project linked at the end of the tutorial. We’ll just go through the highlights here, referring to the steps mentioned above as we go.
The XNA 4.0 API has been changed substantially where render states are concerned, and for the better. Render states have been grouped by functionality into several classes. You create instances of these classes to represent the state you want, then set them on the graphics device, or pass them to SpriteBatch. So first we need to create these render state objects.
Set Up Render State Objects
For Step 3, we need to use the DepthStencilState class to set up the device to always set the stencil buffer to 1. We enable the stencil buffer, set the stencil function to Always, the pass operation to Replace, and ReferenceStencil to 1. This means that as we’re drawing, each pixel will Always pass, and the value in the stencil buffer will be Replaced with 1.
stencilAlways = new DepthStencilState();
stencilAlways.StencilEnable = true;
stencilAlways.StencilFunction = CompareFunction.Always;
stencilAlways.StencilPass = StencilOperation.Replace;
stencilAlways.ReferenceStencil = 1;
stencilAlways.DepthBufferEnable = false;
And for Step 4 we need to use the standard AlphaTestEffect so we can draw the asteroid texture only where the alpha value is 0.
Matrix projection = Matrix.CreateOrthographicOffCenter(0, PlanetDataSize, PlanetDataSize, 0, 0, 1);
Matrix halfPixelOffset = Matrix.CreateTranslation(-0.5f, -0.5f, 0);
alphaTestEffect = new AlphaTestEffect(GraphicsDevice);
alphaTestEffect.VertexColorEnabled = true;
alphaTestEffect.DiffuseColor = Color.White.ToVector3();
alphaTestEffect.AlphaFunction = CompareFunction.Equal;
alphaTestEffect.ReferenceAlpha = 0;
lphaTestEffect.World = Matrix.Identity;
alphaTestEffect.View = Matrix.Identity;
alphaTestEffect.Projection = halfPixelOffset * projection;
We first set up an orthographic projection matrix that matches SpriteBatch. We set AlphaFunction to Equal, and ReferenceAlpha to 0. This means the alpha test will pass whenever the alpha value we’re drawing is equal to 0. In our crater texture, the crater area has an alpha value of 0, while the surrounding area has 1, so only the crater area will be drawn.
For Step 6 we need a stencil buffer state that allows drawing only where the stencil buffer contains a 0. We enable the stencil buffer, set the stencil function to Equal, the pass operation to Keep, and the reference stencil to 0. This means that when we’re drawing, each pixel will pass if the value in the stencil buffer is Equal to 0.
stencilKeepIfZero = new DepthStencilState();
stencilKeepIfZero.StencilEnable = true;
stencilKeepIfZero.StencilFunction = CompareFunction.Equal;
stencilKeepIfZero.StencilPass = StencilOperation.Keep;
stencilKeepIfZero.ReferenceStencil = 0;
stencilKeepIfZero.DepthBufferEnable = false;
Create Render Targets
Now that we have the render state objects created, it’s time to create the render targets. Both are the same, so just one is shown here. This creates a render target with a Color format, and a depth format that includes a stencil buffer.
renderTargetA = new RenderTarget2D(GraphicsDevice, PlanetDataSize,
  PlanetDataSize, false, SurfaceFormat.Color,
  DepthFormat.Depth24Stencil8, 0,
  RenderTargetUsage.DiscardContents);
Draw the Crater Mask
Next up is drawing the crater masks (Steps 2-5). First we activate the render target, clear it to solid black, and clear the stencil buffer to 0.
GraphicsDevice.SetRenderTarget(activeRenderTarget);
GraphicsDevice.Clear(ClearOptions.Target | ClearOptions.Stencil,
                     new Color(0, 0, 0, 1), 0, 0);
Next we begin a SpriteBatch, passing in the stencilAlways and alphaTestEffect objects that we created earlier. Calculate some random rotation, size the crater texture using a Rectangle, and call SpriteBatch.Draw to draw the crater.
spriteBatch.Begin(SpriteSortMode.Immediate, BlendState.Opaque,
                  null, stencilAlways, null, alphaTestEffect);
Vector2 origin = new Vector2(craterTexture.Width * 0.5f,
                             craterTexture.Height * 0.5f);
float rotation = (float)random.NextDouble() * MathHelper.TwoPi;
Rectangle r = new Rectangle((int)position.X, (int)position.Y, 50, 50);

spriteBatch.Draw(craterTexture, r, null, Color.White, rotation,
                 origin, SpriteEffects.None, 0);

spriteBatch.End();
Draw the Planet Texture
Now we need to draw the latest planet texture, using the stencil buffer to mask out the craters (Steps 6-7). We begin a SpriteBatch, passing in the stencilKeepIfZero object we created earlier. Note that the first time we draw the actual planet texture, but subsequently we draw using the texture from the previous iteration.
spriteBatch.Begin(SpriteSortMode.Immediate, BlendState.Opaque,
                  null, stencilKeepIfZero, null, null);

if (firstTime)
{
  spriteBatch.Draw(planetTexture, Vector2.Zero, Color.White);
  firstTime = false;
}
else
  spriteBatch.Draw(textureRenderTarget, Vector2.Zero, Color.White);

spriteBatch.End();
Swap Render Targets
Finally we activate the backbuffer render target.
GraphicsDevice.SetRenderTarget(null);
And then swap the render targets as discussed previously.
RenderTarget2D t = activeRenderTarget;
activeRenderTarget = textureRenderTarget;
textureRenderTarget = t;
In the main Draw function, you draw the latest cratered planet using the textureRenderTarget. Of course, you need to deal with using the planet texture the first time through though. The downloadable code shows one simple way to do that.
GraphicsDevice.Clear(Color.CornflowerBlue);
spriteBatch.Begin();
spriteBatch.Draw(textureRenderTarget, planetPosition, Color.White);
spriteBatch.End();
Conclusion
And there you have it, a powerful technique for altering textures during your game. Doing this entirely on the GPU is quite a bit more complex than GetData/SetData, but is well worth the extra trouble.
There are some things you can do to improve this technique. If you need to add a lot of craters, rather than adding them one at a time you can batch them up for a while, then in Step 5 draw all of them at once.
I hope you found this tutorial informative. Learning about render targets and stencil buffers opens up a whole new world of possibilities beyond just making craters. What other uses can you think of?

8 thoughts on “Texture Modification using Render Targets, with some Stencil Buffer Action”
awesome 🙂
Thanks for posting !
How would this have to change for XNA 3.1 ?
(I am abit reluctant to install XNA 4.0)
Thanks !
@J. Kent See the latest post for a 3.1 version of the sample project.
That’s a good idea! I was initially going to modify my render targets but quit early on when I found that they were cleared on each set call. I imagined I would come back to the idea later if it became important but now I don’t have to, thanks a bunch!
Comments are closed.